1. 설치

     [root@localhost ~]# yum -y install lynx


2. 사용하기

     [root@localhost ~]# lynx http://google.com

'IT > Linux' 카테고리의 다른 글

Vi명령어.  (0) 2013.03.07
by SJ.. 2013. 3. 7. 17:41

명령모드 

i 현재 위치에서 입력 모드로 변경

a 현재 위치에서 우측으로 한칸 이동 후 입력 모드로 변경

I 행의 제일 처음에서 입력 모드로 변경

A 행의 제일 마지막에서 입력모드로 변경

o,O 커서 아래에 새로운 행을 추가하고 입력모드로 변경

s 현재 문자를 지우고 입력모드로 변경

S 현재 행의 모든 문자를 지우고 입력모드로 변경


x 커서가 있는 문자 삭제

X 커서가 입는 앞 문자 삭자

dd 현재 커서의 행 삭제

숫자+dd 현재 커서부터 숫자만큼 행 삭제

yy 현재 커서가 있는 라인을 복사

숫자+yy 현재 커서부터 숫자만큼의 행을 복사

p 복사한 용을 현재 라인 이후에 붙여넣기

P 복사한 내용을 현재 라인 이전에 붙여넣기


검색모드  

/Pattern Pattern이라는 문자를 검색 : n을 통해 아래방향으로 검색, N을통해 위방향으로  검색

?Pattern Pattern이라는 문자를 검색 : ?는 n을 통해 위방향으로 검색 N을 통해 아래방향으로 검색


파일관련 

:e 파일열기(전내용은 증발함)

:enew 현재 창을 닫고 빈문서를 연다.

:q 종료(변경된 내용이 없는 경우)

:q! 강제 종료(변경된 내용이 있어도 무시)

:w 파일 저장

:wq 파일 저장 후 종료


'IT > Linux' 카테고리의 다른 글

텍스트기반 웹브라우저 : lynx  (0) 2013.03.07
by SJ.. 2013. 3. 7. 17:24

Node의 목적은 확장가능한 네트웤 프로그램들의 구축을 쉽게 제공하는것이다.


아래의 "Hello Word" 웹 서버 예제어서, 많은 클라이언트 연결들은 동시에 처리된다.

Node를 operating system이라 말한다. 새로운 connection이 생성시 통보되고, sleep 상태가 된다. 만약 새로운 connetion이 생성되면, callback으로 실행된다.

각각의 connection은 단지 작은 싸이즈의 힙이 할당된다.


var http = require('http');

http.createServer(function (req, res) {

  res.writeHead(200, {'Content-Type': 'text/plain'});

  res.end('Hello World\n');

}).listen(1337, "127.0.0.1");

console.log('Server running at http://127.0.0.1:1337/');


이점은 오늘날 흔히 사용되는 다른 concurrency model과 다른점이다.

Thread-based 네트워킹은 비효일적이며 사용하기에 어렵다.

Node는 각각의 connection에 대해 2MB thread stacks을 할당하는 시스템에 비해서 높은 부하에서 훨씬 좋은 메모리 효율성을 보여줄 것이다.

Node에는 락이 없기 때문에 Node 사용자들은 프로세스 dead-locking 걱정에서 자유로울 것이다. 

Node에는 직접 IO 작업을 수행하는 함수가 거의 없기 때문에 프로세스들은 블록 당하지 않는다.

블록이 없기 때문에 프로그래머들은 시스템을 빨리 개발 할 수 있습니다.


Node는 Ruby의 EventMachine이나 Python의 Twisted와 같은 시스템들의 영향을 받았고 유사하다.


원문.

http://nodejs.org/about/ 

by SJ.. 2013. 2. 26. 18:30

ClientProfile? 

.Net Framework를 이용한 어플리케이션 배포시 문제가 되는 .Net Framework 설치를 쉽게 하고자 MS에서 .Net 3.5 SP1부터 도입한것으로 클라이언트 프로그램에서 필요한 부분만을 자동으로 다운로드 및 설치를 해준다.


문제는 .net framework 4.0client profile 프로젝트는 .Net 2.0으로 만들어진 동적라이브러리를 인식하는데 문제가 발생한다.

따라서 참조 추가 후 log4net 을 사용하려해도 인식하지 못하고 아래와 같은 오류가 발생한다.


The type or namespace name ‘log4net’ could not be found (are you missing a using directive or an assembly reference?)


이런 상황에서는, target framework을 .Net framework 4.0으로 변경하면 해결..!


참조 싸이트 

http://msdn.microsoft.com/en-us/library/cc656912(VS.100).aspx

http://blog.naver.com/saltynut?Redirect=Log&logNo=120068738007

by SJ.. 2012. 12. 5. 18:17

Classic pipeline mode is the standard processing mode used with IIS6.0.

If a managed web application runs in an application pool with classic mode, IIS processes the requests in an application pool by using separate processing pipelines for IIS and ISAPI.

This means that requests for ASP.NET applications are processed in mulitple stages like this :

  1 The incoming HTTP request is received through the IIS core.

  2 The request is processed through ISAPI

  3 The request is processed through ASP.NET

  4 The request passes back through ISAPI

  5 The request passes back through the IIS core where the HTTP response finally is delivered.


Intergrated pipeline mode is a dynamic processing mode that can be used with IIS7.0

If a managed Web application runs in an application pool with integrated mode, IIS processes the request in an application pool by using an intergrated processing pipeline for IIS and ASP.NET

This means that requests for ASP.NET applications are processed directly like this :

  1 The incoming HTTP request is received through the IIS core and ASP.NET

  2 The appropriate handler execeutes the request and delivers the HTTP response.


Form an administrator perspective, applications running in classic pipeline mode can appear to be less responsive than their integrated counterparts.

From an application developer perspective, classic pipeline mode has two key limitations.

First, services provided by ASP.NET modules and applications are not available to non-ASP.NET requests

Second, ASP.NETmodules are unable to affect certain parts of IIS request processing that occurred before and after the ASP.NET execution path.


With an integrated pipeline, all native IIS modules an managed modules can process incomming requests at any stage. 

This enables services provided by managed modules to be used for requests to pages created using static content, ASP.NET, PHP, and more.

Direct integration makes it possible for developers to write custom authentication modules, to create modules that modify request headers before other components process the request, and more.


When woring with the integrated pipeline mode, it is important to keep in mind that in this mode ASP.NET does not rely on the ISAPI or ISAPI Extension modules.

Because of this, the running of an integrated ASP.NET application is not affected by the ISAPI CGI restriction list.

The ISAPI CGI restriction list applies only to ISAPI and CGI applications(which includes ASP.NET classic applications).

For integrated mode to work properly, you must specify handler mappings for all custom file types.


Further, many applications written for classic pipeline mode will need to be migrated to run properly in integrated pipeline mode.

The good news is that the Configuration Validation module, included as a part of the server core, can automatically detect an application that requires migration and return an error message starting that the application must be migrated.

You can migrate application by using Appcmd.exe(general-purpose IIS command -line administration tool)

Any migration error reported by IIS typically contains the necessary command for migrating the application.

To use this command to migrate an application automatically, right-click the command-prompticon and choose Run As Administrator.

You then can migrate an application manually, by running the following command at the elevated cmmmand pompt.


 appcmd migrate config AppPath


where AppPath is the virtual path of the application .

The virtual path contains the name of the associated Web site and applications.

For example, if an application named SalesApp was Configured on the Defulat Web Site and needed to be migrated,

you could do this by running the following command


 appcmd migrate config ""efault Web Site/SalesApp"


When AppCmd finishes migrating the application, the application will run in both classic and integrated modes
by SJ.. 2012. 12. 4. 18:19

1. 스토리지 엔진

 - DB에서 데이터를 어떠한 방식으로 저장하고 접근할 것인지에 대한 기능을 제공한다.

   스토리지엔진의 특성에 따라 데이터 접근이 얼마나 빠른지, 얼마나 안정적인지, 트랜잭션 등의 기능을 제공하는지등의 차이점이 발생한다.


2. MySql 스토리지 엔진

- MyISAM : 기본 스토리지 엔진으로 데이터 저장에 실제적인 제한이 없고 매우 효율적으로 저장한다.

Full-Text 인덱스를 지원하며 특정 인덱스에 대해 메모리 캐쉬를 지원한다. 트랜잭션은 미지원, 테이블 레벨의 락을 지원하며 잦은 변경 및 삭제에는 좋은 성능이 나오지 못하나 데드락 발생은 예방


- InnoDB : ACID트랜잭션을 지원하며, MyISAM 보다 데이터 저장비율이 낮고, 데이터 로드 속다가 느리다.

특정 데이터와 인덱스에 대해서 메모리 캐쉬를 지원하며 외부키를 지원한다.

데이터 압축이 불가능하고 자동 에러 복구 기능이 있다.

Row 레벨의 락을 지원한다.


-Cluster(NDB) : 트랜잭션을 지원하고 모든 데이터와 인덱스가 메모리에 존재하여 매우 빠른 데이터 로드 속도를 자랑하며 PK사용시 최상의 속도를 나타내다.


-Archive : MySQL 5.0부터 새롭게 도입된 엔진으로 자동적으로 데이터 압축을 지원하며 다른 엔진에 비해 80% 저장공간 절약 효과를 자랑한다. 그리고 가장 빠른 데이터 로드 속도 또한 자랑하지만,  insert와 Select만이 가능하다.


-Federated : MySQL 5.0부터 새롭게 도입된 엔진으로 물리적 데이터베이스에 대한 논리적 데이터베이스를 생성하여 원격데이터를 컨트롤 할 수 있다.

실행속도는 네트워크 요소에 따라 좌우되면 테이블 정의를 통한  SSL보안 처리를 한다. 

분산데이터베이스 환경에 사용한다.

http://www.thegreatgoodplace.com/tt/study/168?category=30


http://linuxism.tistory.com/447

'IT > DB & Nhibernate' 카테고리의 다른 글

DB attach 오류  (0) 2012.05.29
오라클 : 계층형 데이타 쿼리  (0) 2011.10.28
SQLServer2005에서 계정 비밀 번호 변경  (0) 2011.10.28
.NET에서 오라클 사용하기  (0) 2011.10.28
NHibernate에서 중복 제거  (0) 2011.10.28
by SJ.. 2012. 11. 12. 15:10

원문 : http://blog.naver.com/kbk9879?Redirect=Log&logNo=120137136990


엑셀을 업로드할때 숫자와 문자를 병행하여 입력할때가 종종있다.

이번에 회사에서 일을 하다가 평소에 숫자값으로 들어가다가 갑자기 문자값도 들어갈 수 있다고

하여 별생각이 없었는데..

업로드할때 문자값이 나오지 않은 것이다..ㄷㄷㄷ

구글링을 통해 확인결과..

ODBC에서 엑셀내용을 저장할때 1~8번째 행을 확인하여 그 FIELD값이 전부 숫자일경우 8번째 행

이후의 값이 문자이면 모두 NULL값으로 처리가 된단다..ㄷㄷㄷ

결국 해결책을 찾을려고 다시 구글링을 하였는데 다들 IMEX=1 이렇게 하면 된다고 한다..

하지만 난 이미 적용시켰는데도 불구하고 되지 않고 있으니..

나의 ODBC connect부분이다.

string strProvider = "Provider=Microsoft.Jet.OLEDB.4.0; Data Source=" + strFilePath + "; Extended Properties=\"Excel 8.0;HDR=yes;IMEX=1\"";

oleDBCon = new OleDbConnection(strProvider);

......이로써 구글링으로 해결책을 찾는데 3시간이나 보냈다가..

어느 PDF로 찾은 결과..레지스트리에 있는 TypeGuessRows의 값을 수정하면 된다는 글을

보게 되었다..

TypeGuessRows의 default값이 8로 되어 있는 것을 확인할 수 있는데..

이 값으로 ImportMixedTypes에 정의되어진 type으로 정해진단다..

결국 TypeGuessRows의 값을 늘리고 다시 업로드를 해보니 잘된다..

TypeGuessRows의 값을 늘릴때의 부작용에 대해서는 아직 확인을 못하고 있어서..우선

이렇게 적용시켜놓고 추후에 문제가 발생하면 확인해봐야겠다..ㅠㅠ

[해당 레지스트리가 존재하는 위치]

WINDOWS XP

HKEY-LOCAL-MACHINE\SOFTWARE\Microsoft\Jet\4.0\Engines\Excel

WNDIOWS SERVER 2008(32비트)

HKEY_LOCAL_MACHINE\SOFTWARE\Microsoft\Office\14.0\

Access Connectivity Engine\Engines\Excel

WINDOWS SERVER 2008(64비트)

HKEY-LOCAL-MACHINE\SOFTWARE\Wow6432Node\Microsoft\Jet\4.0\Engines\Excel

by SJ.. 2012. 11. 1. 11:35


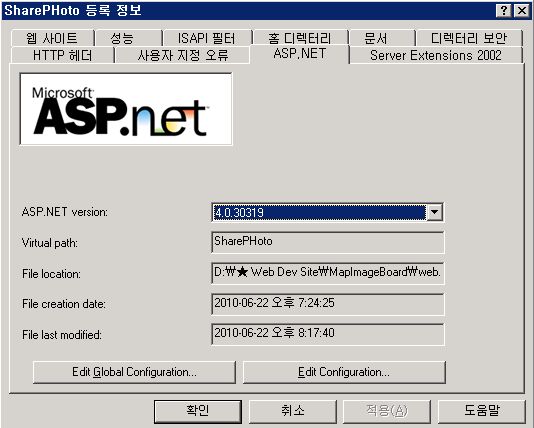
Windows 2003 IIS 6.0에 .NET Framework 4.0으로 개발한 웹페이지가 정상적으로 동작을 하지 않았다. 그래서 아래와 같이 서버에 작업을 했더니 정상적으로 동작 하더라.

서버에 작업 내용

1. .NET Framework 4.0 설치 (서버 재부팅)

2. ASP.NET version 4.0으로 수정

이렇게만 하면 될것 같지만 404 페이지를 확인 할것이다.

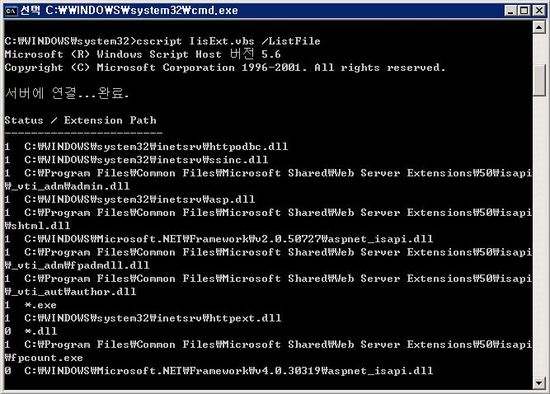
3. C:\WINDOWS\system32 폴더에서 cscript IisExt.vbs /ListFile을 실행해보면

C:\WINDOWS\system32\Microsoft.NET\Framework\v4.0.30319\aspnet_isapi.dll의

상태값이 0으로 되어 있는것을 확인 할수 있을 것이다. 해당 dll의 상태값이 1이 되야 정상적으로

.Net 4.0으로 개발된 페이지를 호출 할 수 있다.

4. cscript iisext.vbs /EnFile C:\WINDOWS\Microsoft.NET\Framework\v4.0.30319\aspnet_isapi.dll 실행

완료가 되었으면 상태값을 확인해 보면 1로 변경되었을 것이다.

by SJ.. 2012. 6. 26. 18:17

원문 : http://www.aspnet-video.com/ASPNetVideo/documentation/tutorials/?help=ASPNetVideo_Tutorial_HTML_Alternative


How To Add HTML Alternative Content

ASPNetVideo generates your HTML Alternative directly in your ASPX Webform. It allows you to render other WebControls and components within your HTML Alternative, as you would within an ASP.NET Panel object.

In all instances, the ASPNetVideo WebControl renders HTML Alternative Content beside the video markup.  If the user's browser is capable of displaying the video content, the video is displayed over the alternative content on the web page.  This technique is beneficial because:

  • It provides a viable alternative for website users with no appropriate Video Plugin.
  • It gives alternative content for accessibility.
  • It provides extra content which search engines can read and spider.

1.  Key Concepts

The HTML Alternative content is always rendered.  It is placed within an HTML element, whose ID attribute matches that of the ASPNetVideo WebControl instance. Where the video plugin is available to the user - The video object is written over this content.

The HTML alternative is set using either the smart tags in the designer view, or by hand in the code view (see below).

To test and debug your HTML alternative - you can set the component's Enabledproperty to false.  This will render only the HTML alternative and not the Video content.

2.  Set HTML Alternative Content using the Designer

If you wish to edit your HTML Alternative using the designer, click on the Smart Tagbutton (looks like a play button on the top right corner of the control).  You should see something similar to the following:

ASPNetVideo WebControl Suite HTML Alternative Content Tutorial Smart Tags

Then, click on "Edit Templates" and the following should appear:

ASPNetVideo WebControl Suite HTML Alternative Content Tutorial Template Editor

At this point, you can drag and drop or type content directly into this content window, as shown here:


3.  Set HTML Alternative Content using Source Code

If you wish to add your HTML Alternative content using ASPX source code, go to the code view.  First, add a set of "HTMLAlternativeTemplate" tags within your ASPNetVideo tags.  Then place your alternative content within these new tags, as shown below:


by SJ.. 2012. 6. 8. 15:38

원문  : http://osskorea.tistory.com/133


FFMPEG(http://www.ffmpeg.org/)를 사용하여 ASP.NET에서 썸네일을 만든다거나 클래스를 만들고 해당 동영상이 들어오면 영상파일을 다른 포맷으로 압축하여 저장한다던지 할 때 필요한 예제이다.
예외처리나 안전하게 활용할 수 있는 코드처리는 안되어 있고 아래 첨부한 출처와 파일에서 좀 더 활용 가능한 전체 클래스 소스를 소개하였다. (테스트에 사용한 프레임워크 : 닷넷 프레임워크 4.0)

1. 필요한 파일은 ffmpeg.ext pthreadGC2.dll SDL.dll 이다.

2. 웹프로젝트를 만들고 다음과 같이 코딩하여 테스트 하여 본다.
        protected void Button1_Click(object sender, EventArgs e)
        {
            // 프레임 미리보기 (쎰네일)
            var video = Page.MapPath("test1.mpg"); //source
            var thumb = Page.MapPath("") + "\\frame.jpg"; //target
            var ffmpeg = new Process
            {
                StartInfo =
                    {
                        Arguments = " -i \"" + video + "\" -s 108*80  -vframes 1 -f image2 -vcodec mjpeg \"" + thumb + "\"", FileName = Page.MapPath("ffmpeg.exe")
                    }
            };
            ffmpeg.StartInfo.UseShellExecute = false;
            ffmpeg.StartInfo.CreateNoWindow = true;
            ffmpeg.StartInfo.RedirectStandardOutput = false;
            ffmpeg.Start(); //return true/false
        }

        protected void Button2_Click(object sender, EventArgs e)
        {
            //파일변환
            var video = Page.MapPath("test1.mpg"); //source
            var mpg = Page.MapPath("") + "\\video.mpg"; //target
            var ffmpeg = new Process
            {
                StartInfo =
                {
                    Arguments = " -i \"" + video + "\" -target vcd \"" + mpg + "\"",
                    FileName = Page.MapPath("ffmpeg.exe")
                }
            };
            ffmpeg.StartInfo.UseShellExecute = false;
            ffmpeg.StartInfo.CreateNoWindow = true;
            ffmpeg.StartInfo.RedirectStandardOutput = false;
            ffmpeg.Start(); //return true/false
        }

        //함수로 만들어서 사용하는 예
        public void Convert(string sourcevideo)
        {
            var formatedvideo = DateTime.Now.Ticks + ".flv";
            // video = Page.MapPath("test.wmv");
            var mpg = Page.MapPath("~/Videos/") + formatedvideo;
            var ffmpeg = new Process
            {
                StartInfo =
                    {
                        Arguments = " -i \"" + sourcevideo + "\" -target vcd \"" + mpg + "\"",
                        FileName = Page.MapPath("~/ffmpeg/ffmpeg.exe"),
                        CreateNoWindow = true,
                        UseShellExecute = false
                    }
            };
            ffmpeg.StartInfo.UseShellExecute = false;
            ffmpeg.StartInfo.CreateNoWindow = true;
            ffmpeg.StartInfo.RedirectStandardOutput = false;
            ffmpeg.Start();


by SJ.. 2012. 6. 8. 11:17
| 1 2 3 4 |